11.29.2010

Diaper Holder


Well since I have a few friends and family members that are expecting babies, I wanted to make them something cute that they could use. These diaper holders are great for quickly grabbing diaper and wipes all in one.I found the idea here.

What you will need:
Sewing machine
Thread
Fabric

Fabric you will need:
Sixteen 4X4 squares
Two 5 wide X 8 long (you will fold this piece in half, long ways)
Eight 4X4 squares of flannel to add thickness and color
Two 2 1/2 wide X 8 long of flannel to add into the top pieces

(I bought 2 fat quarters of the pink and orange, 1/3 yard of the green, 1/3 yard flannel, and 3/8 yard of the brown and I made almost 3 holders)


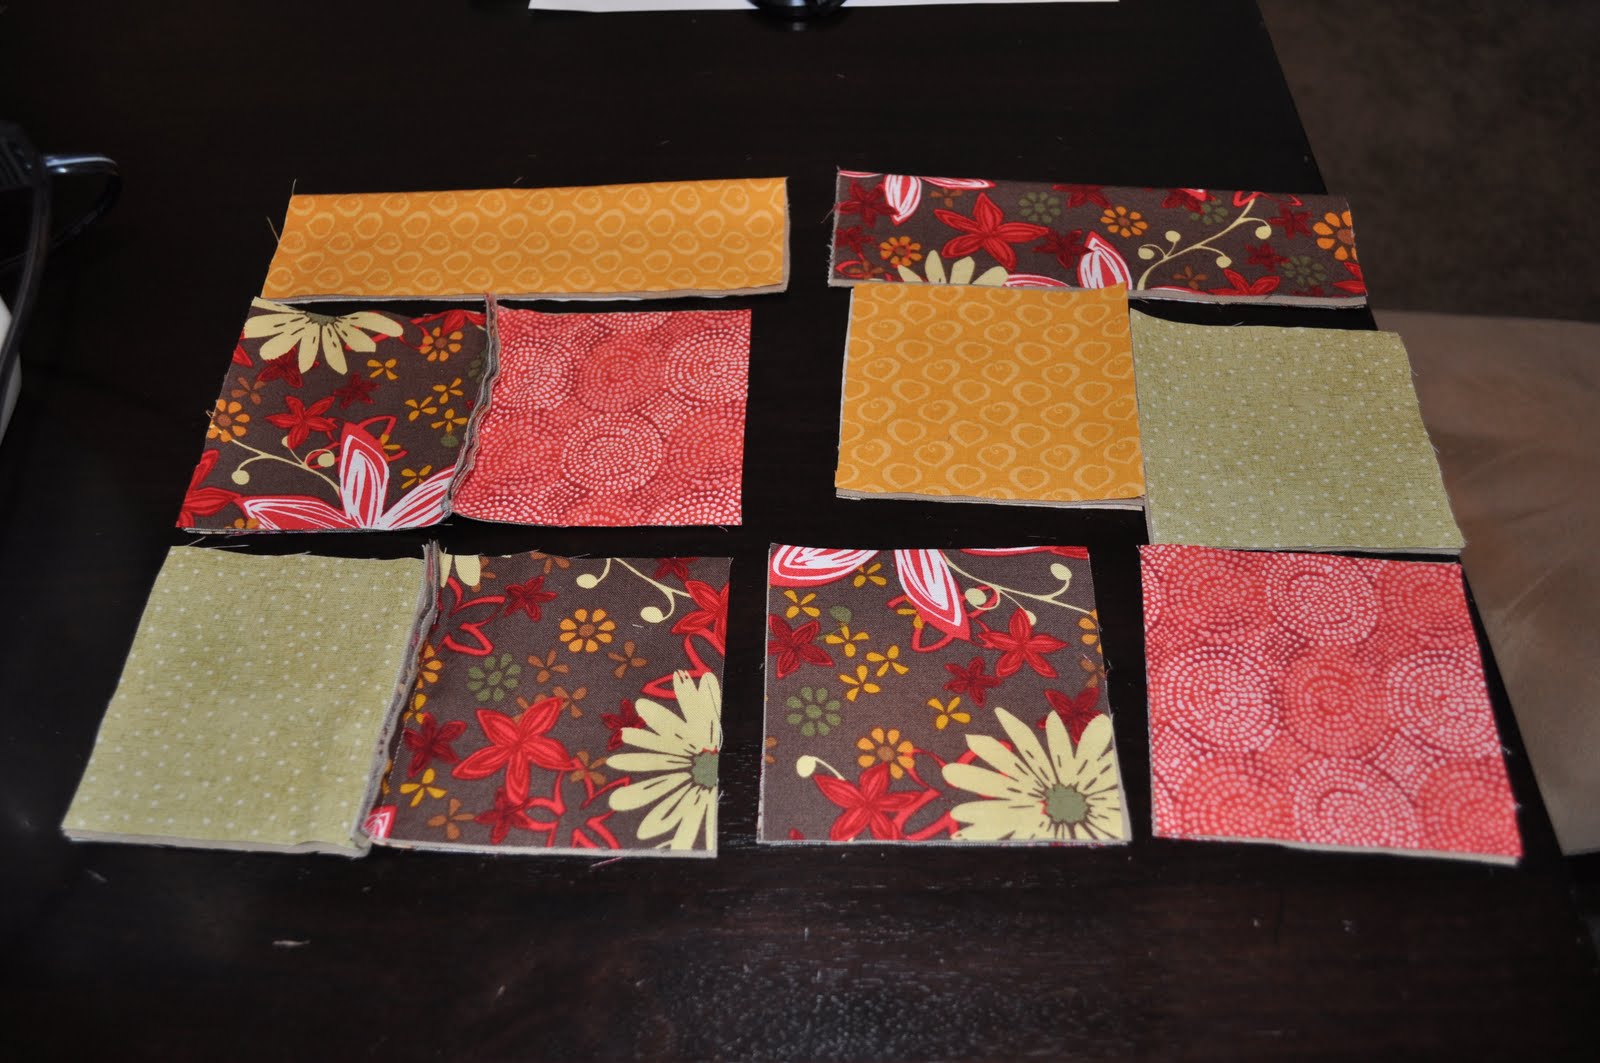
Layer each of the squares for sewing. The bottom will be the inside of the holder, lay face down. Then add flannel and the top piece. For top piece lay flannel in between the fold.

The Lil' Luna blog has a good example of how things are supposed to be sewn together.

After you have your squares laid out in the order you want them sewn them together, take the bottom 2 squares and sew them together with 1/2 inch seam allowance. You want the seam to be on the outside. Then match the top 2 squares together and do the same thing, be sure to keep the seams open. The top strip will then be attached to the top blocks.


Repeat these for side 2.

Sew the 2 sides together with 1/2 inch seam allowance, leaving the seams open.


Clip the seams about 1/2 inch apart. Once you wash it, the ends will start to fray and it will look like a rag quilt.


The case can hold 4-6 diapers or 2 diapers with a wipey case.

11.18.2010

Color Coded Bookcase....

I LOVE books! And because I love them so much I have A LOT of books. Which is wonderful, but it does cause me a lot of trouble when trying to organize my bookcase in a pleasing manner.
Then I had a thought....COLOR CODE it! I love to color code things (I even color code me and my husband's closet, I know I might need help).
So, if you are like me and need to change something up every now and then, try color-coding.... doesn't that look nice? (Now I know I need to get more Yellow books)

11.17.2010

FREE Thanksgiving Printable....

Remember the SUPER FUN printable for Halloween? Look at what Jessica has put together for Thanksgiving?! I just love the look of the burlap. Head on over to her blog to have one for your home and remember to tell her Thanks!


11.16.2010

Giveaway WINNER!

Thanks to everyone who entered our Giveaway! According to random.org.... our lucky winner is #1.
And who is #1:

aprilhoyt said...


It's adorable!! I want one! (my email is hoytphotography@yahoo.com) I am a follower already.


Congrats! Keep checking us out for more fun ideas for you home and more giveaways!

Paper Bag Turkey Tutorial

Last week for our Young Womens at our church we were making centerpieces for a Thanksgiving Dinner we do every year for some of the people in our ward. One of the ladies I serve with came up with this idea and it was so fun and EASY!
These Turkeys turned out so cute, this is definitely something you can make with the whole family.

What you need:
paper bags
scissors
rubber band
candy corn (I found mine on a SUPER discount at the grocery store)
pipe cleaners
google eyes
crayons (or paint if you are brave)
hot glue gun


1. Cut the bottom out of your bag.
Now you have a paper tube.


2. Then cut your bag down the side.

3. With your bag opened up flat, you can now decorate your turkey. We used crayons (he probably would have been more excited if I had gotten out the paints, but I wasn't brave enough this day).

4. Now crumple it up, smash it, open it up and do it again. This helps your bag have more texture and easier to work with without ripping your bag.
5. Take a scoop, about 1/3 cup of candy corn and put on your bag. (I also used dry black beans for this part, this is the "guts" of your turkey, my boys really liked playing with the turkey guts such boys)

6. Gather your bag up around your guts and secure with the rubber band.


7. Now straighten out your turkey tail and figure out which way your turkey stands best.

8. Take your pipe cleaner and fold in half, then take the top, twist together and then roll it to make a turkey head. Twist the bottom/neck part together too.


9. Hot glue your neck & head on. Then add your google eyes and I cut the tip off a candy corn to make the beak.


10. You are done, find a place to line up your flock of turkeys. We made quite a few and took them to Grandparents.

I hope your family has as much fun as we have with these turkeys!

11.10.2010

Dinosaur Cape Tutorial & Giveaway!

I came up with this cape for Halloween for my boys, it is light-weight so it is easy to move in and simple to make. Here’s how...


Here’s what you need:

(1) Fat Quarter or 18 inch x 22 inch piece of fabric

(1) 9x12 inch piece of felt
(1) 37 inch Bias Tape (this will be the top of your cape and the tie, so you can measure your little one and decide what length you will need)

Coordinating Thread

1. Cut out your dinosaur spikes out of the felt. I used spikes because that is what my boys wanted, but you could also use smooth bumps like ½ circles or really spikey spikes. For this one I made a paper template that was 3 ¼ inch x 3 ¼ inch x 3 ¼ inch. I needed about 6 spikes of this size to go all the way down the back of the cape. Set them aside.

2. Now we move to the ironing board. On the 22 inch side of your fabric, fold toward the wrong side about ½ inch of fabric and iron, then fold and iron it over again. This hides the raw edge and keeps it from unraveling. Do this to the other side as well. (As a side note I am totally embarrassed by my ironing board! I will be making a new ironing board cover very shortly)

3. Now take your fabric and fold it in half RIGHT SIDES TOGETHER lining up those nice edges you just made and iron.


 4. On the sewing machine, stitch down the 22 inch sides that we ironed.
5. (This step is optional so if you don’t want to you really don’t have to.) You can take each of your spikes and top stitch.

 6. Align your spikes in the crease we made when we ironed the fabric in half and gently fold the fabric back over. Carefully pin each spike. Stitch down this folded seam with a ½ inch seam allowance. Then Stitch again with a ¼ inch seam allowance to reinforce the seam.


 7. Now roll the bottom edge toward the WRONG SIDE ¼ inch and then roll again and iron. Now Stitch this edge.
8. Sew a gathering stitch along the top edge of the cape. Gentle pull thread to gather the top of the cape until it measures about 9 ½ inches.
 9. Find the middle of your bias tape and line that up with the spikes of the cape. Carefully pin bias tape along the top edge of the cape, hiding the raw edge inside the bias tape.
10. Stitch along the edge of the bias tape.


11. And you are all done! I hope you have as much fun pretending with your little ones as I have had with mine.


Wouldn’t this make a fun Christmas or Birthday Gift? Well, you could WIN one! That’s right I’m going to be GIVING AWAY one Dinosaur Cape.

Just leave a comment (with your email) to enter. Want another entry? Become a Follower and leave another comment. Good Luck! Giveaway ends Tuesday November 16, 2010.

11.04.2010

Super Easy Wreath

I saw this idea on Studio 5 (to see the video follow this link:
http://studio5.ksl.com/index.php?nid=61&sid=11571711) and I knew I had to give it a try.

What you need:
one 12 inch foam wreath form (from dollar store)
2 pairs of tall (taller the better) socks
Ribbon for hanging and making a bow.

The socks that they come out with for the holidays and Christmas would be great. I found these at the dollar store too and they are just simple and cream so I can leave the wreath up all year.
The first thing you need to do is to cut your wreath form on the seam. I just used a sharp knife and it cute right through, be careful though.

Then cut the toe off your socks and the heal. So you will be left with two pieces like this.
Then start threading your socks onto your wreath form. I put a small piece, then large, then small, etc. So that it would be even, but it doesn't really matter. You have to pull the wreath form gentle open and then slip the sock onto it. I found it was easiest if I scrunched up the sock (just like you would put on a pair of tights) and slipped it on.

Once it is on you can smooth it out more.
Then to hide the edges, I just rolled over one edge and tucked the other sock into it and then fluffed them up a little bit. The seam between gets lost pretty good in the texture of the wreath. If you really wanted to you could sew them right sides together into a long tube and then there would be only one spot to hide under your bow/ribbon.
Add a bow or simple ribbon and you are done. I really love how the fabric gives the wreath a different texture than my other wreaths and I love how easy and quick it was.

11.02.2010

Treasure Island

I recently joined a bunco group and being the "new girl" earned me the right the throw the first themed bunco party this month. I have chosen the theme of Treasure Island! It has been a lot of fun putting together gift ideas and I thought I'd post what I came up with.

The prizes are arranged in order the first 4 being more expensive and then the last
8 of the same value. The more expensive gifts are treasure chests filled with jewelry and chocolate...a bunch loot for girls! So I went to Hobby Lobby in search of treasure chests and found 3 wooden unpainted boxes and varnished them a dark cherry wood. After the varnished dried (2-3 days) I sanded the edges to try and give a aged look. It didn't work very well but I like finished look. I then lined the interior of the boxes with satin fabric and filled it with loot. (chocolate gold coins give a nice finishing touch!)